Feeds:
Posts
Comments

Mmmm…banana bread!  My mother’s recipe for banana bread is hands-down, the best banana bread I have ever eaten.  It is banana-y, moist, and fluffy.  I’ve been making this banana bread for years.  I use very ripe bananas – yep, the more black spots on the peel the better.  It makes the bread sweet and moist!   Usually, if I have bananas in the bunch that have gone past the point of no-return (Adam nor I will even attempt to eat the banana raw), I’ll throw them in the freezer knowing that banana bread is on the horizon!  The bananas turn this awful black color when frozen, but if you pull them out of the freezer about an hour or so before making the bread, they are perfect – mushy and sweet.

I visited my sister in Vermont for “Match Day” for her medical school.  She anxiously waited, with her classmates, to find out where she would be working as a resident for the next 4 years.  The anxiety in the room was palpable.  When it was finally done, and my sister got the letter that told her she would be working at her #1 choice, we went to lunch.  My sister chose a place that served breakfast all day & I couldn’t have been happier.  I love breakfast and brunch!  I knew right away what I wanted on the menu – the banana bread french toast with real Vermont maple syrup.  The meal was blow-your-mind good!  I knew I had to make this the next time I made banana bread!

On a lazy Saturday afternoon, I whipped up some banana bread.  Once it was cool, the french toast making began.  I started with a few eggs, a splash or two of milk, whisked them together, dipped the slices of banana bread, and cooked until golden-brown in a hot pan.  Then I sprinkled the slices with a cinnamon-sugar mix, drizzled them with real Vermont maple syrup, and we enjoyed every last bite!

Mom’s Banana Bread
Printable Recipe

1 cup flour
1/2 cup sugar
2 1/2 tsp baking powder
1/2 tsp salt
1/4 tsp baking soda
3/4 cup oatmeal, quick cooking
1 egg beaten
3 TBS melted butter
1/2 cup milk
2 bananas, mashed
1/3 cup chopped walnuts (optional)

Preheat oven to 375 degrees F.  Butter a loaf pan and set-aside.

Mix all dry ingredients in a bowl.  In another bowl, whisk egg, butter, and milk.  Make a well in the dry ingredients and mix until moistened.  Add bananas and nuts and mix to combine.  Transfer batter to the loaf pan, and cook for 30 to 40 minutes.  Let cool in pan slightly, then transfer to a wire rack.  Slice and enjoy!

Paska

Paska is a traditional Easter bread made in Eastern European countries including Poland, Ukraine, and Slovakia.  Christian symbolism is associated with this bread.  My grandmother, mother, and various relatives make this bread each year for Easter.   I have been making it for the last several years. Paska is a sweet bread, and raisins are a good addition if you like raisins.  I do not, and therefore, I do not add them.  Paska is also a hearty, rich bread, but it has this amazing ability to feel light and almost fluffy when toasted.  It is a good complement to kielbasa, or any sandwich.  I prefer mine with butter – lots of butter!   Adam and I love paska!

I remember eating paska at my grandmother’s house when I was a little girl.  My grandmother knew that my family loved it so much, she would usually make it for us when we visited even when it wasn’t Easter.  My grandmother made hers with golden raisins, which I promptly removed with a flick of my butter knife.  My sister and I would take our thick, toasted, butter-slathered paska slices out on to the front porch, and consume them feverishly, licking every trace of butter off of our fingers and then request more.

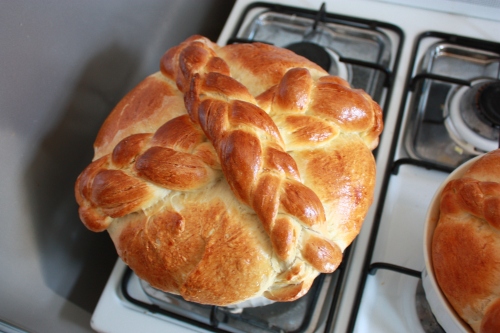
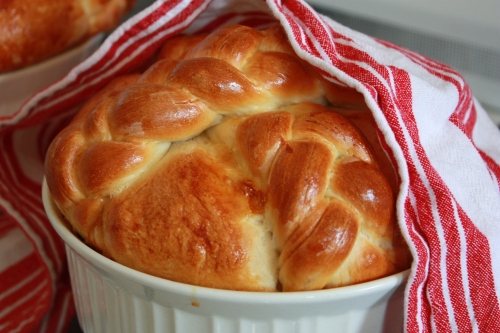
If you plan on making this paska, please be aware that it will take a better part of your day to make, as it needs to rise twice and bake for 45 minutes.  This recipe makes two paskas.   As you can see from the photo, I use soufflé dishes.  My mother uses two metal dog bowls (she specifically uses for paska making, and no, the dog does not use them).  They are perfect size for the paska!   This recipe is Mary Urim’s Paska.  I do not know who Mary Urim was, nor do I know where my grandmother found this recipe, but I feel I need to give Mary Urim credit – her paska is incredible!

Mary Urim’s Paska
Printable Recipe

9 1/2 – 10 1/2 cups flour
1/2 cup sugar
1 package dry yeast
2 cups of milk
3 TBS oil
4 TBS butter, melted
4 eggs, beaten and separated
1 TBS salt

In a bowl, add yeast to 1 cup of lukewarm water and mix.  Let set for 10 minutes.

Meanwhile, scald the milk.  Add the sugar, stir until the sugar is dissolved.  Remove from heat, and let cool.

In another bowl, mix 3 eggs, butter, oil, and salt.  Add the yeast mixture, and milk mixture, and whisk to combine.

Add 9 1/2 cups of flour to a stand mixer fitted with the dough hook.  Gradually add the egg/milk/yeast mixture while mixing.  Mix the dough for 10 minutes.  Adding up to 1 to 1 1/2 cups of additional flour.  The dough should pull away from the sides of the mixing bowl and not stick.  If it is sticking, gradually add more flour.

Coat a large bowl with oil.  When dough is done mixing, place in bowl and turn to cover all sides of the dough with oil.  Cover with a kitchen towel and let rise to double it’s size.  Approximately 30 minutes.  You may also place the bowl in a warmed oven to speed up the rising process.  After the dough has risen, take it out of the bowl, punch it down a little, and separate into two pieces and form into a ball.  Work with one dough ball at a time.

To make braids (2 braids for each bread):  From each dough ball, cut a piece off to make the braids.  From that piece of dough, cut into two.  Cut those two pieces of dough into 3.  (Now you should have 6 small pieces of dough).  Roll each piece of dough into a rope, and then braid 3 pieces together.  Repeat with remaining dough to create a second braid.

Place reserved dough ball into a well oiled round baking dish.  Place one of the braids over the dough ball in the pan, tucking the ends under the ball.  Place the second braid over the first in a cross, again tucking the ends under the dough ball.  Repeat process with second dough ball.  Let dough rise again until doubled in size – approximately 30 minutes.

Preheat oven to 350 degrees F.  Make egg wash – beat 1 egg and 2 TBS water.  When dough has risen to double in size, brush the tops with the egg wash.  Bake for 45 minutes or until the bread is golden.  Let cool in pan, and then remove to wire rack to cool completely.  Slice and enjoy!

Dear Blog,

Hello, It’s me, Anne.  Do you remember me?  My poor blog…I have neglected you.  I have not forgotten about you.  It is a classic case of “It’s not you, it’s me”.  Just after Easter, I came down with a cold that kicked my butt.  I was forced to stay in bed for 2 weeks.  I did not cook during that time, nor did I blog about the food I had made previous to falling ill.  Then, after recuperating, I started a new job, that has also kicked my butt.  I have come home tired, and felt completely uninspired in the kitchen.  However, now I am getting used to my new schedule, and feel that it is time to get back in the kitchen, and stop neglecting you, my blog.  Here’s to many more months of consistent blogging!

Sincerely,

Anne

Passover Feast

Passover is one of Adam and my favorite Jewish holidays.  It is a happy holiday with a lot of celebrating, eating, and drinking wine.  Any holiday that invites eating and merriment, is a holiday for me!

Over the years, Adam and I have enjoyed sharing in each other’s family’s traditions and holidays.  The look on Adam’s face, our first Christmas morning, was priceless!  He couldn’t believe the abundance of gifts.  It made my mother so happy that he enjoyed himself!  My journey in learning Adam’s family’s traditions around the holidays, has been one that I have embraced whole-heartedly!  I love tradition.  I love the ritual of the holidays.  I love knowing what I can expect of the day.  This is why I love Passover so much.  There is a book – the Haggadah – a manual of sorts, describing what the holiday should be about – remembering and retelling.  This book, the Haggadah, tells the story of the Israelites exodus from Egypt.  It also tells how the Passover Seder should be conducted, special prayers and songs, and even some fun games for the children (hiding a piece of matzo for the children to search for).  The Passover Seder (ritual dinner) can take several hours to complete before the feasting begins.  Oh, and do we feast!

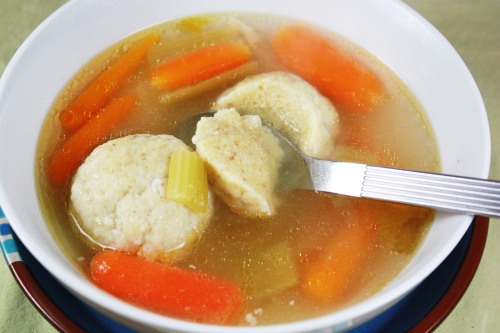
I began planning our Passover Seder a week before.  It is a challenge to plan a dinner party with a small oven that has only one oven rack (only one dish at a time in our oven!).  Since matzo, unleavened bread, is the focus and star of the Passover meal, I decided to make matzo ball soup.  I thought I had Adam’s grandmother’s recipe for matzo balls, until we were sitting down to dinner and realized that it was not his grandmother’s recipe, but one I had used 6 years ago, which I meant to throw out.  Oy vey!  They were still okay, but a bit too dense.  I won’t share the recipe, as not to perpetuate the cycle of a bad matzo ball.  I used my recipe for chicken soup but omitted the egg noodles.

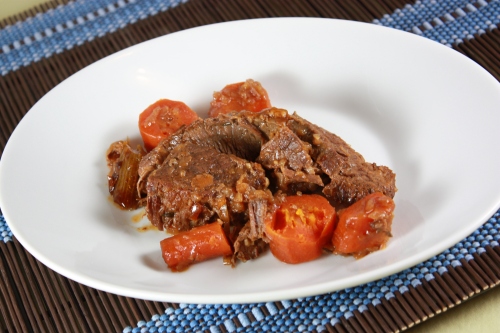
For the main course, I made brisket.  Brisket and I have a long history.  Not a good one.  For Adam and my first Passover together, I decided to try to make brisket – something I had never done before.  I got a recipe from his family and bought a regular brisket from the grocery store.  It was amazing!  I mean, it was blow-your-mind amazing!  I felt pretty confident about my brisket, so the next year, I decided to go all out.  I went to Whole Foods and bought a $45 brisket – surely a grass-fed, pampered cow!  Okay, so expensive meat, great recipe, experience form last year should have yielded an out-of-this-world brisket, right?!   WRONG!!!  It was tough, almost inedible, and sitting in watery soup, not a tasty sauce.  Disaster!  Feeling completely deflated and a bit gun-shy, I didn’t make another brisket until a Hanukkah gathering a few years later.  Completely nervous, I forged ahead.  Hoping that a different recipe would produce better results.  The brisket was okay.  Not like the first time I made it, but okay.  This year, I decided to put my trust in The America’s Test Kitchen.  They haven’t failed me yet.  We did all of our Passover shopping at Fairway, and bought a fairly small brisket 2 1/2 pounds.  I cut the recipe in half hoping this would work!  I thought that by halving the recipe, I should also halve the cooking time – not so.  I have now learned the secret to cooking brisket, and I am going to share it with you.  Guess what it is?  Cook the crap out of it & keep the lid on!  Yep, low and slow forever!  On the internet, people suggest 1 hour for every pound & I now completely get it.  I checked my brisket at 1 hour, and it was rock hard, I checked it at 2 hours and it was getting softer!  2 1/2 it was even better, and at 3 it was almost falling apart, tender and succulent!  I even threw in some carrots and celery to add flavor.

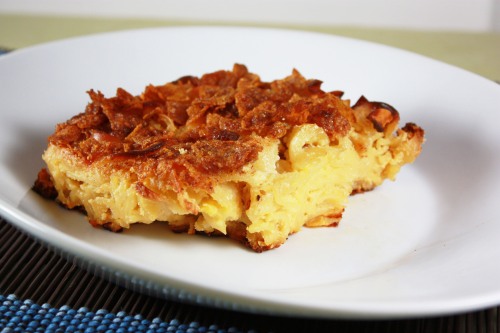
For a side dish, I decided to use my trusty recipe from the New York Times for kugel.  Now, there is potato kugel and noodle kugel – there are savory and sweet kugels.  The one I make is a sweet noodle kugel with a cornflake topping.  It is perfection!

Braised Brisket
adapted from The America’s Test Kitchen

1 (4 to 5 pound) beef brisket, trimmed
salt and pepper
2 TBS vegetable oil
6 onions, halved and sliced thin
2 TBS brown sugar
6 garlic cloves, minced
1 tsp tomato paste
1/4 cup all-purpose flour (or 1/8 tsp corn starch and water)
1 cup beef broth
1 cup chicken broth
1/2 cup dry red wine
4 bay leaves
4 sprigs fresh thyme or 1/2 tsp dried
1 TBS cider vinegar
5 to 6 ribs of celery cut in 1 inch pieces
4 to 5 carrots cut into 1 inch pieces

Preheat oven to 300 degrees F.  Pat the brisket dry with paper towels, then season with salt and pepper.  Heat oil in a large Dutch oven over medium-high heat until simmering. Brown the brisket on both sides, about 10 minutes, then transfer to a plate.

Add the onions, brown sugar, and 1/4 tsp salt to the fat left in the pot and return to medium heat.  Cook until the onions are well browned, about 10 minutes.

Stir in the garlic and tomato paste and cook until fragrant, about 30 seconds.  Stir in the flour and cook for 1 minute.  Stir in the broths, wine, bay leaves and thyme scraping up any browned bits.  Add the brisket, and spread the carrots and celery around the meat.  Bring to a simmer, cover, and cook in oven until fork slides easily in and out of the center of the brisket, 2 1/2 to 3 hours.

Transfer brisket to a cutting board, tent with foil, and let rest for 15 minutes.  Let the liquid in the pot settle for 5 minutes, then skim any fat from the surface using a spoon.  Discard the bay leaves and thyme sprigs, stir in the vinegar, and season with salt and pepper to taste.

Slice the brisket thin across the grain.  If you are making the brisket the day before, return the meat to the pot, cover, and refrigerate over night.  Remove brisket from the refrigerator 30 minutes before reheating.  Reheat on stove top or in oven.  Remove and arrange the brisket on a platter, pour some of the sauce over the meat and arrange the vegetable around it.  Serve and enjoy!

Noodle Kugel
New York Times

Butter (for the dish)
salt, to taste
16 oz medium egg noodles
1 1/4 cups (2 1/2 sticks) unsalted butter, softened
6 ounces cream cheese, at room temperature
1 cup honey
5 eggs
1 cup sour cream

Cornflake Topping for Kugel

1 cup Cornflakes
1/2 stick butter, melted
3 TBS sugar
1/2 TBS cinnamon

Set the oven at 350. Generously butter a 9-by-13-inch baking dish.

In a large pot of boiling salted water, cook the noodles according to package instructions until they are tender. Drain them and rinse with cold water. Spread them evenly in the baking dish.

In an electric mixer, cream the butter and cream cheese. Beat in the honey, followed by the eggs, one at a time. Beat in the sour cream. The mixture should be thick and creamy. Pour it over the noodles.

Bake kugel for 25 to 30 minutes.  Mix all ingredients for the cornflake topping.  Sprinkle cornflake topping evenly on kugel and continue baking for 25 minutes more, or until it is set and golden brown. Let the kugel sit for 10 minutes. Cut into squares.

Adam’s Birthday Weekend

I love birthdays!  Especially, when it is someone else’s birthday.  Someone else getting older, and being the center of attention.  For Adam’s birthday, this year, we decided to take full advantage of the unusually warm weather in New York, and utilize our deck for a small gathering of friends.  I, of course, had great plans to make a fantastic feast for Adam, which I completely forgot to photograph.  I made a lovely Pappa al Pomodoro soup (Tuscan bread soup), green salad with grapefruit and mint vinaigrette, baguette with roasted garlic and parmesan cheese, roasted tomato caprese salad, and double chocolate brownies from the April issue of Martha Stewart Living magazine.  I was a busy cook on Saturday!

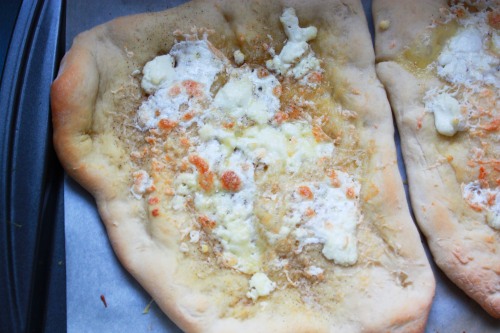
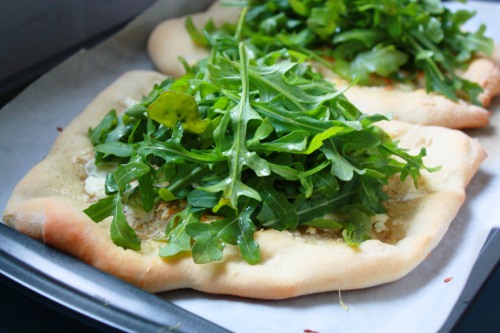
On Sunday, I made Ina Garten’s White Pizza with Arugula.  They were perfect for my tiny oven and lack of a pizza stone.  I’d never made pizza dough from scratch, but I can tell you, I will use this recipe from now on.  It was so easy and tasty!  The flavors of the 3 cheeses, the homemade garlic oil, and topped with the lemon peppery arugula, was divine!  It was a Happy Birthday for Adam & his tummy.

White Pizza with Arugula
by Ina Garten
Printable Recipe

For the Pizza
1 1/2 cups warm water (100 to 110 degrees)
2 packages dry yeast
1 TBS honey
olive oil
4 cups all-purpose flour, plus extra for kneading
salt
4 garlic cloves, sliced
5 sprigs fresh thyme
1/4 tsp crushed red pepper flakes
ground black pepper
3 cups grated Italian Fontina cheese (8 ounces)
1/2 cups grated fresh mozzarella (7 ounces)
11 ounces creamy goat cheese such as Montrachet, crumbled

For the salad
1/2 cup good olive oil
1/4 freshly squeezed lemon juice
8 ounces baby arugula

For the dough, combine the water, yeast honey, and 3 tablespoons olive oil in the bowl of an electric mixer fitted with a dough hook.  Wait approximately 10 minutes, until the yeast has dissolved.  Add 3 cups of the flour, then 2 teaspoons salt, and mix on medium-low speed.  While mixing, add up to 1 more cup of flour, or just enough to make a soft dough.  Knead dough for about 10 minutes until smooth, sprinkling it with the flour as necessary to keep it from sticking to the bowl.  When dough is ready, turn it out onto a floured board and knead it by hand a dozen times.  It should be smooth and elastic.  Place the dough in a well-oiled bowl and turn it to cover it lightly with oil.  Cover the bowl with a kitchen towel and allow the dough to rise at room temperature for 30 minutes.

Meanwhile, make the garlic oil.  Place 1/2 cup olive oil, the garlic, thyme, and red pepper flakes in a small sauce pan and bring to a simmer over low heat.  Cook for 10 minutes, making sure the garlic doesn’t burn.  Set aside.

Preheat the oven to 500 degrees.  (Be sure your oven is clean!)

Dump the dough onto a board and divide it into 6 equal pieces.  Place them on a sheet pan lined with parchment paper and cover with a damp towel.  Allow the dough to rest for 10 minutes.  Use immediately, or refrigerate for up to 4 hours.

Press and stretch each ball into an 8-inch circle and place 2 circles on each parchment-lined sheet pan.  (If you’ve chilled the dough, take it out of the refrigerator approximately 30 minutes ahead to let it come to room temperature.)  Brush the pizzas with the garlic oil, and sprinkle each one liberally with salt and pepper.  Sprinkle the pizzas evenly with Fontina, mozzarella, and goat cheese.  Drizzle each pizza with 1 tablespoon more of the garlic oil and bake for 10 to 15 minutes, until the crusts are crisp and the cheeses begin to brown.
Meanwhile, for the vinaigrette, whisk together 1/2 cup of the olive oil, the lemon juice, 1 teaspoon salt, and 1/2 teaspoon pepper.  When the pizzas are done, place the arugula in a large bowl and toss with just enough lemon vinaigrette to moisten.  Place a large bunch of arugula on each pizza and serve immediately.

Eggplant Parmigiana

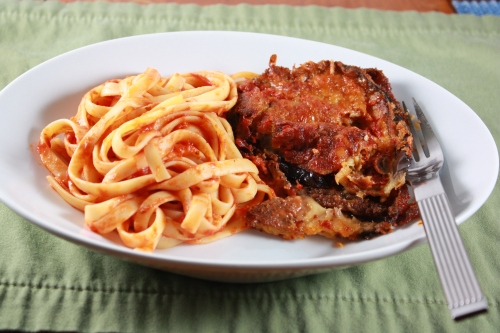
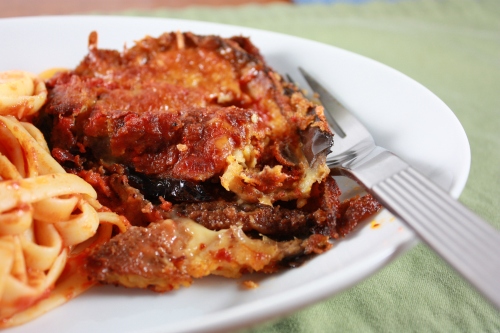
Okay, so this photo doesn’t do this recipe justice!  On the plate, it looks like pasta with a blob next to it.  But, let me tell you, this eggplant parmigiana is magic in your mouth!  It is completely unhealthy, breaded, fried eggplant smothered in cheese and homemade sauce, but it is absolutely amazing!

I couldn’t decide what to make the other night for dinner.  I started walking to the grocery store without a plan.  Adam would say that this is a disaster waiting to happen because he’s been with me at the grocery store when I haven’t made a list of groceries.  We come home with way more than we should!  On my way to the store, I witnessed a car accident – just a little fender bender.  No injuries. But, it happened right next to me and I got a bit of a jolt of adrenaline from the squeal of the tires and the smashing of metal.  The driver who caused the accident immediately got out and apologized to the other driver with a very heavy Brooklyn accent – in the style of “fuggeddaboutit”.  I immediately thought of having Italian food for dinner.  Eggplant Parmigiana!

Now, to do it right, you’ve got to bread it and pan fry the eggplant first to make sure it doesn’t get too mushy.  Also, I decided to make my own sauce from scratch so as to have some leftover for the pasta.  It takes some time to make, but it well worth it!  It was dynamite!

Eggplant Parmigiana
by Anne
Printable Recipe

Sauce:
1 can (28 oz) crushed tomatoes
1 onion, halved
4 TBS butter
2-3 cloves garlic
1 tsp Italian seasoning
salt to taste

Eggplant Parmigiana:
1 medium to large eggplant, cut lengthwise into 1/4 inch slices
1/4 to 1/2 the recipe of sauce or 1 store-bought jar
1/2 to 1 cup Italian style breadcrumbs
3 to 4 eggs
1 cup flour
salt and pepper
1/2 bag shredded mozzarella
1/2 cup Parmigiano cheese
oil for frying

First make the sauce: Put a large saucepan over medium heat, add the butter and melt.  Add the garlic and cook 1 minute.  Add the tomatoes and onion, and bring to a low simmer. Cover and simmer for 30 minutes. Uncover, taste and add salt as necessary.  Simmer for an additional 15 minutes stirring occasionally.
Preheat the oven to 350 degrees F.

Place the bread crumbs shallow bowl. Crack 3 of the eggs into another shallow bowl; season with salt and pepper and beat with a fork to mix.  Put the flour in another shallow bowl and season with salt and pepper.  Arrange the eggplant, flour, beaten eggs, and bread crumbs on a work surface near the stove.

Heat about 1/4-inch olive oil in a large skillet over medium heat.  When the oil is hot, dredge several eggplant slices first in the flour, then dip them in the egg, and finally coat them in the bread crumbs. Put as many eggplant in the skillet as will fit comfortably in a single layer and cook until tender and well browned on both sides.  Drain on paper towels. Cook all of the eggplant slices this way, adding more oil to the pan as needed.

To assemble the dish, first get yourself set up with a large, buttered baking dish. Have ready the eggplant, the tomato sauce, the shredded mozzarella cheese and the Parmigiano.  To start, spoon some of the tomato sauce over the bottom of the baking dish. Now add a layer of eggplant.  Sprinkle with about one-third of the cheeses. Repeat with tomato sauce, eggplant, cheese until the all of the eggplant is used and the last of the cheeses are on top.

Put the dish in the oven and bake for about 1 hour, until golden and bubbling. Let stand for about 15 minutes before cutting.  Enjoy!


Chocolate Surprise Cake

I mentioned in a previous post that our friend, Karen, was recently killed in a hit-and-run car accident in New York City.  At her memorial, we received a program that included a few of Karen’s favorite recipes.  Karen loved to cook and hold wonderful dinner parties.  I made her cake because, not only did it sound interesting, I wanted to honor her memory.

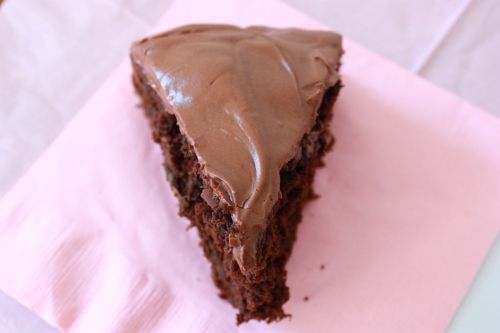
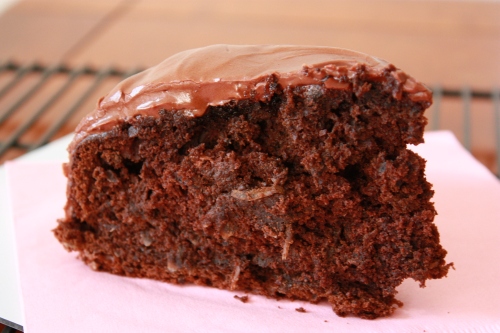
When Adam and I saw Karen’s recipe for chocolate surprise cake, we knew we had to try it.  I was intrigued and a bit shocked to find out that the surprise was sauerkraut.  Yes, sauerkraut.  The same sauerkraut that you enjoy on bratwurst and hot dogs.  That very same sauerkraut was in this lovely recipe for chocolate cake!  I was a little nervous about it, but Karen loved it & who knows, it might become a new favorite of ours.

I brought the cake over to our friend’s house for a small Oscar party.  I let them know what the “surprise” in Chocolate Surprise Cake was, and they, too, seemed excited and curious.  The first bite was taken a little tentatively, but after realizing that the frosting was amazing, and the sauerkraut really just added texture and not a bunch of salty flavor, they were game.  What a fun chocolate cake!

Karen’s Chocolate Sauerkraut Surprise Cake
by Karen Schmeer
Printable Recipe

Cake:
1 stick unsalted butter, softened
1 1/2 cups granulated sugar
1 cup unsweetened cocoa powder
1 tsp baking powder
1 tsp baking soda
1/4 salt
2 cups flour
3 large eggs
1 tsp vanilla extract
1 cup water
1 cup sauerkraut (well rinsed, drained, and chopped).  Fresh or bagged is best, but Karen always said “from a jar works just fine.”

Frosting:
4 oz. semisweet chocolate, chopped
2 oz. unsweetened chocolate, chopped
1/2 stick unsalted butter
1/2 cup sour cream
1 tsp vanilla extract
1/4 tsp. salt
2 cups confectioner’s sugar, sifted

Preheat oven to 350 degrees F.  Butter and flour a Bundt cake pan.  (Karen used 2 round 9″ pans).

In a large bowl, cream the butter and sugar until fluffy.  Beat in eggs, one at a time, and then add vanilla.

Sift together dry ingredients (flour, baking soda, baking powder, salt, cocoa powder).  Slowly beat these into the creamed mixture, alternating with 1 cup water.  Stir in sauerkraut.  Pour the batter into the prepared baking pan(s).  Bake 35 to 40 minutes.  (If using 2 round pans, only bake 15 to 20 minutes).  Cool completely in the pan.

Make the frosting.  In a double boiler (or  just carefully in a regular pan), melt both types of chocolate with the butter over low heat.  Remove from heat.  Stir in the sour cream, vanilla, and salt.  Gradually add the confectioner’s sugar, beating until frosting is spreadable.  When cake is cool, remove from the pans and frost.

Adam and I love Mexican food!  We were completely spoiled in Los Angeles with the abundance of great Mexican restaurants, and our wonderful friends cooking for us.  I honestly do not believe that I cooked any sort of Mexican food while in LA.  I didn’t have to, and how could I compete?  While my co-workers shared their homemade salsa, I baked a good ol’ apple pie.  I really should have taken advantage of the fresh California avocados, cilantro, tomatillos, etc., but, alas, I did not.  Now, I’m living in Brooklyn, NY, where places like California Burrito are packed, but the food is just not up to par.  I miss our burrito stand right around the corner from our house.  We could get a burrito for under $5 that would blow-your-mind!

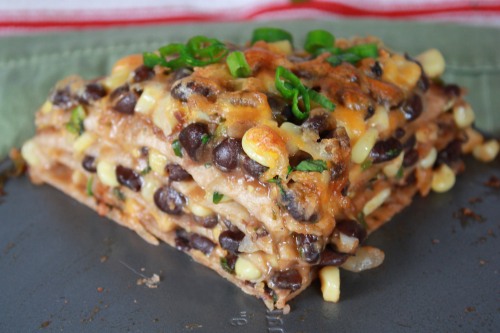
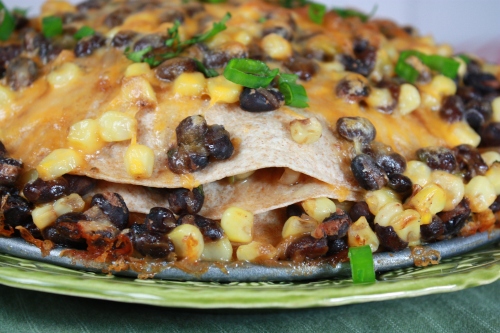
Okay, enough about burritos and California.  Since I can’t find good Mexican food in Brooklyn, I decided I’d make it myself, and it took the form of Tortilla Pie.  I found a recipe on this really cute food blog, Pink Parsley.  I had the majority of ingredients, but had to send Adam out to the Bodega for the rest of the items to complete this dish – namely, the beer.  I love recipes that call for beer!   I love enjoying a nice cold beer with a warm, spicy meal.  This Black Bean and Tortilla Pie did not disappoint!  It was spicy, smokey, cheesy and satisfied my craving for Mexican food!

Black Bean and Tortilla Pie
adapted from Pink Parsley
Printable Recipe

4 (10-inch) whole-wheat flour tortillas
1 Tablespoon canola oil
1 large onion, diced
2 cloves garlic, minced
1/4 tsp chipotle powder
1/2 tsp cumin
1/2 tsp chile powder
salt and pepper
2 (15-ounce) cans black beans, drained and rinsed
1 (10-ounce) bag frozen corn
1 12-ounce beer, or 1 1/2 cups chicken broth
4 scallions, thinly sliced, plus more for garnish
1/2 cup cilantro, coarsely chopped, plus more for garnish
8 ounces cheese, shredded (I used Mexican cheese blend)
salsa and sour cream, for serving (optional)

Preheat the oven to 400 degrees F.  Using the bottom of the pan as a guide, use a paring knife to trim the edges of the tortillas so that they fit in a 9-inch springform pan.

Heat the oil in a large skillet set over medium heat.  Saute the onion until soft, 5-10 minutes.  Add the garlic, chipotle powder, cumin, chile powder, salt and pepper, and cook until fragrant, about 30 seconds.  Add the beans and beer to the skillet, and bring to a boil.  Reduce heat and simmer until most of the liquid has evaporated, 8-10 minutes.  Mix in the corn, scallions, and cilantro, and remove from heat.

Lay one of the tortillas across the bottom of the springform pan.  Layer with 1/4 of the beans, and sprinkle with cheese.  Repeat 3 times, finishing with beans and cheese.  Bake until cheese is melted and the mixture is heated through, about 20-25 minutes.

Remove from oven and unmold the pie.  Garnish with remaining scallions and cilantro, and serve with your choice of topping (salsa, sour cream), or as is. Enjoy!

Chicken Soup

Chicken soup is a cure-all, right?  It is commonly known for its cold-curing capabilities, and it’s ability to heal the soul.  We needed some soul-healing a few weeks ago.

At the end of January, Adam’s and my world was rocked when we found out our good friend, Karen, died after being struck by a car in Manhattan.

She had stopped to buy groceries on her way home from work.  1/2 a block from her apartment, she was crossing the street, when a getaway car speeding from a robbery at a CVS struck and killed her.   They had been driving the wrong way on a one-way street, with their lights off to elude the police who were chasing them.  The thieves stole non-prescription medications, and now the driver, a 25 year-old young man is being charged with second-degree murder, and our brilliant, kind, amazing friend has been taken from us.  It leaves me with this question:  How could this happen?

Karen was an award-winning film editor, a sister, a daughter, a co-worker, a friend.  She had so much left to do on this earth.  On her 40th birthday, instead of going on the trip her closest friends had planned as a surprise, we were honoring her life with a memorial service in Boston, this past weekend.

After we were delivered the terrible news, we had to deal with the fact that our lives go on even when someone dies.  It is unfair.  The lease to our new apartment had just been signed and we were moving.  Adam and I ate take-out for several days until I could unpack some of my kitchen things.  Chicken soup, is what I made first in our new place.

Chicken soup is comforting, easy to make, and only requires a few ingredients.  Perfect for having just moved & suffering a loss of a dear friend.  I knew it could not cure our feelings of grief, but there is something to eating a familiar dinner that “wraps its arms” around you while your hands hug the bowl.

Chicken Soup
by Anne with a little help from The Eclectic Cook
Printable Recipe

1 Whole Chicken (4-5 pounds)
1 medium onion, halved
2 cloves garlic, smashed
salt and pepper
1 bay leaf
1 bag of baby carrots (separated)
6-8 celery stalks (separated)
2 sprigs parsley
water
1/2 bag egg noodles (8 oz or so)

Place chicken, garlic cloves, parsley, bay leaf, 1/2 bag of baby carrots, 3-4 stalks of celery cut into 1 inch sections in a Dutch oven or other heavy stock pot.  Add water to completely cover the chicken and veggies.  Bring to a boil, then reduce heat to medium low and simmer, covered, for 30 minutes.  Turn off heat and remove chicken from pot, and place in a baking dish.  Leave the vegetables in the stock.  Remove the chicken meat from the carcass and set it aside.  Return the carcass to the pot.  Bring to a boil, then reduce heat and simmer, covered, for 1 ½ hours.  Allow stock to cool slightly, then set a strainer over a bowl, and strain out the veggies while collecting the stock.  Return stock to the pot and add diced chicken, the rest of the bag of baby carrots and 3-4 stalks of celery cut into small pieces.  Bring to a boil and cook for about 10-15 minutes, then add the egg noodles to the pot.  Cook until noodles are tender (according to package directions). Remove from heat adjust for seasoning with salt and pepper, and add additional fresh parsley, if desired.


Finally, after a very long search (viewed almost 15 apartments), and temporarily living with friends, we have an apartment of our own!  Amos and Sadie apparently approve of our choice in residence, and are loving their new place.  Amos loves to look out onto our back porch, and is looking forward to us fulfilling the promise of someday taking him outside on it…

We are not quite done unpacking boxes, which makes for fun climbing and exploring for both of the kitties.  Sadie and Amos appreciate having our bed back, and usually retreat there during the day for napping.  Amos chooses to snuggle-in to our king size Laura Ashley pillows…

While Sadie sits like the princess that she is…